Styles and Types of Ceilings

Ceilings Perth play a crucial role in shaping how rooms are used and perceived. High ceilings can make homes feel spacious and regal, while lower ceilings can create a cozier and more intimate ambiance.

Ceilings

Conventional ceilings are flat, low-cost, and easy to install. They can be finished with a variety of textures to add visual interest.

Coffered ceilings are an architectural feature that can provide a sense of dimensionality and grandeur to a room. They typically incorporate a grid of beams, or coffers, that creates recessed panels. These panels are often decorated with a variety of different finishes and moldings, which can help add texture and design interest to the ceiling. The term “coffer” actually means indentation, and the specific shape of those indentations can vary widely. Some coffered ceilings are square, rectangular or octagonal while others may be more elaborate in their design.

Although coffered ceilings are typically seen as a traditional element, they can also be used in modern spaces to add elegance and sophistication. The geometric patterns of the recessed panels are often accented by recessed lighting, which can further enhance the visual impact of these ceilings.

A coffer ceiling can be created using a variety of materials, including wood or plaster. Depending on the desired style, these ceilings can be finished in rough-hewn wood to convey a rustic feel or ornate plasterwork for a Baroque-inspired space. In addition to bringing a sense of depth and dimension to a room, these ceilings can also serve a practical purpose by helping reduce noise levels and allowing for the concealment of structural elements, such as pipes or wires that cannot be removed or relocated.

Despite their complexity, coffered ceilings are not difficult to construct for homeowners who are familiar with the process. The standard method involves the use of a set of main base beams, which are usually built perpendicular to existing ceiling joists. The sides of these beams are then wrapped with pieces of bead casing, which is glued and nailed to the joists to create the appearance of intersecting beams.

For homeowners who are unsure of how to incorporate a coffered ceiling into their home, a professional can usually offer advice on the most effective approach. The contractor can also help ensure that the design will work well with the room’s dimensions and existing furniture, as well as advise on which type of molding will best complement the ceiling.

Beamed Ceilings

A beamed ceiling is another way to add depth, character, and architectural appeal to a living space. The look varies in style depending on the type of ambiance you want to create, whether it’s rustic warmth or a sleek modern aesthetic. The type of material used for the beams also affects how well the design integrates with your home’s aesthetic and how much it will cost to install.

Beams are a classic architectural feature that have been around for centuries and can be made from wood, stone, or a combination of materials. They can be painted, stained, or embellished with extra moldings or details for added flair. If you’re concerned about the expense of a real-wood beam, faux beams are a great alternative that mimic the appearance of aged, weathered timber.

Using the same basic construction techniques as traditional ceiling beams, these options can be installed as a standalone structure or integrated into an existing flat ceiling. They can be designed to cleverly conceal ductwork or wiring, ensuring they add beauty without compromising a room’s structural integrity.

A wood beam ceiling can work beautifully in rustic, farmhouse, or country homes, creating a cozy, welcoming atmosphere. If you’re seeking a more formal feel, this style also complements traditional and transitional styles thanks to its timeless elegance. The natural texture of these wooden beams blends easily with a neutral color palette, creating a harmony between rough and refined materials.

In a contemporary space, exposed beams can be a statement feature that enhances a lofty open floor plan and showcases your home’s unique design. They can be trimmed with recessed lighting or a grid of decorative insets to illuminate the space while adding visual interest.

For a truly stunning ceiling, you can incorporate both wooden and faux beams to create an eye-catching combination of textures that celebrates techniques from the past. This design element is particularly effective in open living spaces that can support the drama of a vaulted or coffered ceiling.

A beamed ceiling can enhance the ambiance of any living space, transforming it into a place where you want to spend time. The key to integrating this design element is understanding your personal style and how it can complement the beam pattern you choose. Larger rooms can handle more intricate layouts, such as a coffered ceiling, while smaller spaces can benefit from the simplicity of parallel or perimeter beams.

Coved Ceilings

Cove ceilings are the perfect accent to any home design, whether traditional or modern. Often overlooked or not even considered when remodeling, this ceiling style adds an element of architectural sophistication to any room. In addition, the beauty of a coved ceiling allows homeowners to personalize their spaces without requiring costly crown moulding.

The defining characteristic of a coved ceiling is its rounded curved framing detail that connects your wall and ceiling. Unlike flat ceilings, which end at a hard 90-degree angle, this rounded transition creates a soft, seamless finish.

This unique ceiling option can be installed in a variety of ways, depending on your preference and your space. The most popular method is a top and bottom reveal, which features a smooth curve from the ceiling to the walls. The top edge of the cove can be raised by adding another piece of wood (or fur down) to form a step, or it can be made deeper and more pronounced. The bottom edge of the cove can also be made deeper or more pronounced, creating a stunning tray ceiling effect.

For a simpler look, you can also install a smooth coved ceiling without a reveal. This style is often used in new construction to create a seamless connection between your walls and ceiling, while removing the need for expensive crown molding.

Some homes may have a cove ceiling already in place, and if this is the case you will need to measure your curve radius and then select a preformed gypsum cove base. Cove base is available in a wide range of gauges and finishes, so you can find the perfect match for your existing ceiling. Some bases are even designed to hide imperfections in the drywall.

If you’re looking to make a bold statement with your ceilings, a stepped or tray ceiling is the way to go. With its dramatic curving shape, this ceiling will transform any room and highlight your design sense. The defining characteristic of this ceiling type is its curved transition from the wall to the ceiling, but it’s important to keep in mind that your ceiling can be as simple or as complex as you like.

Textured Ceilings

Though textured ceilings are sometimes considered outdated, they can still add character and charm to a room. They also hide imperfections in the drywall and offer sound control. They are available in many different styles, and some can be visually stunning. The type of texture you choose depends on your preferred style, maintenance needs, and noise control requirements.

The most popular drywall texture is orange peel, which is created by spraying a layer of drywall compound onto the ceiling. This slightly bumpy but soft-looking surface is a common choice for modern homes and business premises, offering the look of a textured ceiling while remaining easy to wipe clean. It’s also one of the most affordable drywall texture methods.

A skip trowel texture is an eye-catching option that creates a distinctive pattern. This texture looks similar to stucco and can be used to create an elegant Mediterranean-style aesthetic. The light reflects off of the peaks and depressions, creating a beautiful effect in well-lit rooms. Avid DIYers can apply this type of ceiling texture, although professional help is usually required for more complex textures.

Swirl ceilings combine elegance with artistry, giving your home a unique appearance. This texture is created by applying a thin layer of drywall compound and using a tool to create swirling patterns. The swirls can be uniform, or they can have small breaks in them for a more artistic design.

Another option is a spray sand ceiling texture, which uses sand mixed with the drywall compound to create a grainy look. This is often applied with a hopper gun or paint sprayer, but can also be applied by hand. It is often chosen for a casual and comfortable living space, adding warmth and comfort to the home. This type of texture is a good choice for homes with children because it masks smudges and drips more easily than smooth surfaces.

No matter which type of texture you choose, it’s important to prepare properly. Start by thoroughly cleaning the entire surface to remove any dirt, dust, or debris that could compromise the adhesion of your texture. Then, sand the area to remove any rough spots. Once the sanding is complete, prime the ceiling before applying your chosen texture.
Industrial Epoxy Flooring

Epoxy coatings are popular for industrial floors. It is important to understand what your specific flooring needs are before choosing an epoxy.

Epoxy Flooring

Epoxies are a durable surface that is long-lasting. It is also resistant to heat, chemicals and shock.

The shiny surface of the epoxy reflects light, which can help increase illumination in large spaces. It is also safe to walk on because it includes traction-enhancing materials like gravel, aluminum oxide or polymer grit.

High Durability

Epoxy is one of the toughest flooring materials on the market, and it will keep your floors looking beautiful for many years. It’s able to withstand high impact, heavy loads, and harsh conditions, which makes it an ideal choice for commercial and industrial settings. This flooring material is also extremely durable against stains, chemical damage, and sharp objects. Its longevity and durability are unmatched in comparison to other types of flooring, including tile and vinyl.

Epoxies are resistant to scratches by nature, but they can be enhanced even further with a wide variety of top coatings and abrasion-resistant finishes. Some examples of these are urethane and melamine top coats, which can increase the durability of your epoxy floors and enhance their visual appeal at the same time.

The durability of your epoxy floor depends on a number of factors, from the quality of your chosen coating to the level of maintenance that is performed on it. Floors that are regularly cleaned and free of debris tend to have longer lifespans than those that are neglected. It’s also important to avoid exposing your floor to extreme temperatures, as this can affect its resilience and durability.

Other factors that can contribute to the longevity of your epoxy floors include the use of rubber or felt pads on the legs of furniture and equipment, distributing traffic evenly in high-traffic areas, and scheduling regular maintenance tasks like resealing and repairs. These simple practices can greatly improve your flooring’s lifespan and reduce the risk of costly repair or replacement. The quality of the initial installation is also crucial, as poorly prepared or executed surfaces are prone to early failure. This is why it’s so important to seek out the services of an experienced, professional flooring contractor when installing your new epoxy floor. The right team will ensure that the underlying surface is clean, dry, and free of cracks and holes before applying the epoxy. They will also make sure that the application process is done correctly to ensure maximum durability. This will save you money in the long run as it will protect your investment and ensure a long lifespan for your epoxy floor.

Easy Maintenance

When you have a new epoxy floor in your garage, workroom or entryway you will want to keep it looking good as long as possible. And this is easy with a little care and attention. Unlike carpet, tile or vinyl flooring that can become worn and dirty looking, epoxy floor coatings are very durable and stain resistant. This is due in part to the extensive prep and curing procedures that are necessary prior to the actual application of the epoxy materials. In addition, the epoxy material itself is chemical and abrasion resistant. This makes them a great choice for high traffic areas where the surface needs to be able to withstand harsh wear and tear.

When it comes to cleaning your epoxy floor, it is important to sweep the floor frequently and use a dust mop to remove any large debris from the floor surface. This will help to keep the surface dirt and grit free, which is very important because these can scratch or damage the floor coating.

If there is a spill on your epoxy floor, you should wipe it up as soon as possible to prevent any damage or staining. For larger spills or oily stains, you can use a kitchen scrubbing sponge or deck brush and warm water to wash the area. If the stains persist, you can try using some Simple Green or ammonia solution and scrubbing lightly.

A common mistake people make is to not sweep and scrub their floors often enough, which can lead to a buildup of grit and grime over time. This can cause the epoxy to wear and dull over time, so it is important to do a thorough cleaning once a week or more as needed.

If you do notice that your epoxy is starting to wear out, it may be time to recoat the area to prevent further damage and deterioration. This will also help to maintain the beauty, durability and moisture mitigation that are all benefits of having a seamless epoxy floor in your home or business. Other signs that it is time to recoat include discoloration, chipping or peeling areas and noticeable scratches or abrasions.

Variety of Colors

Epoxy floors can be made in a wide variety of colors to match any design aesthetic and complement the colors of other design elements in a room. Lighter colors can make a room feel larger and more open, while darker tones can create a more intimate atmosphere.

The color of an epoxy floor also affects how it looks under different lighting conditions. Brighter epoxy colors can appear too bright in spaces with a lot of natural sunlight and may create a harsh glare. Darker epoxy colors, on the other hand, can help minimize glare and create a soothing ambiance.

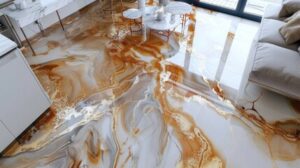
If you want your floor to be an artistic statement piece rather than a utilitarian necessity, there are several types of epoxy flooring that can be used as a canvas for intricate works of art. For example, a flaked epoxy system uses colored flakes injected inside the epoxy to produce a multi-hued look for a floor. This style is popular in locker rooms, clinics, commercial kitchens, sports venues, and showrooms.

Another type of flooring that combines functionality with artistic expression is a metallic epoxy. This variation incorporates tiny metal particles into the epoxy mixture, which create dazzling swirls of rainbow color when reflected by the light in your space. The result is a unique and striking appearance that can be an eye-catching conversation starter.

Aside from varying color options, there are also many different textures that can be applied to an epoxy floor. These textured coatings add depth and visual interest to a floor and can be great for areas where you’ll need to navigate carts, forklifts, or other heavy equipment.

One of the most interesting and unusual options for an epoxy floor is a pattern that mimics a natural scene or landscape. These types of patterns can be effective for creating designated zones in large warehouses or manufacturing facilities, where it’s important to mark loading bays, forklift paths, and walkways.

Antistatic epoxy is also available, which helps to prevent damage to sensitive electronic components and parts by safely transferring static electricity to defined earthing points. This option is ideal for cleanrooms and specialized food processing facilities where there is a high risk of static discharge from personnel.

Easy Installation

Epoxy is a long-lasting material that can be used in a wide variety of environments. This makes it the ideal flooring choice for garages, workshops, commercial kitchens, warehouses, and more. It is durable, provides a seamless coating, and comes in a wide range of colors. Additionally, epoxy floor coating is resistant to heavy loads, sudden impact, fire, and high temperatures.

This durable flooring option is relatively easy to install, even for homeowners with minimal construction experience. Before the epoxy can be applied, it is essential to prep the area. This is a time-consuming process, but it is necessary to ensure that the epoxy adheres properly. This prepping can include mechanical surface scrabbling, grit blasting, and degreasing.

Once the surface has been cleaned, it is important to wait a minimum of 28 days for the concrete to cure. Then, it is a good idea to sweep the floor and vacuum it thoroughly. Finally, a degreaser can be used to get rid of any remaining oils or grease that may prevent the epoxy from bonding to the concrete.

After the concrete has dried, it is a good idea to apply a self-leveling primer. This is typically done with a paint roller. Once the primer has dried, it is time to mix the epoxy resin and hardener. This can be done in a bucket using the manufacturer’s instructions. Once the epoxy is mixed, it can be applied to the floor with a roller or squeegee.

If you would like your floor to be less slippery, a non-skid solution can be added to the second coat of epoxy. This is usually done by mixing the flakes into the bucket of mixed epoxy according to the product’s directions and stirring with a drill and stirring bit.

Then, the flakes can be scattered on the wet epoxy in your desired pattern. Once the flakes are in place, the final coat of epoxy can be applied. Once the second coat of epoxy is dry, it’s a good idea to mask off and paint the bottom 4 inches of your garage or basement walls with the same epoxy mix you used on the floor. This creates a smooth transition that also protects the walls from damage.

Cabinet Painting Tips

Cabinet Painting Sacramento is a big project, so make sure you plan for enough time. Remove all hardware, place it in a plastic bag, and cover countertops with brown builder’s paper or high-density plastic drop cloths.

Cabinet Painting

Choose a durable, high-impact paint that can withstand wear and tear and frequent cleaning. Alkyd enamels create a hard finish that resists yellowing, but water-based latex paints have improved over the years, too—and they don’t release dangerous volatile organic compounds.

When it comes to painting cabinetry, there are a variety of paint types and finishes that are available. The type you choose depends on the look and durability you’re after, as well as your budget.

Regular wall paint is less expensive than cabinet paint, and it offers a range of colors and sheens to match any decor scheme. However, it takes longer to dry than cabinet paint, which can be a disadvantage if you need your kitchen cabinets painted quickly.

Cabinet paint is formulated with more resins than regular wall paint, making it more resistant to moisture and scratches. It’s also typically formulated with special pigments that help camouflage imperfections and provide a high-quality finish. The increased durability makes it a better choice for high-traffic areas such as kitchens.

Oil-based paint is another option for cabinetry, but it’s not easily accessible or DIY-friendly. It has a strong odor, takes a long time to dry and requires special clean up techniques. Plus, it tends to yellow over time.

A water-based alkyd enamel is a great alternative to oil-based paint, and it’s a good choice for wood cabinets. It mimics the durability of oil-based paint, but it dries with a soft sheen that’s easier to clean than flat or satin paints.

Other specialty paints that are worth considering for cabinetry include chalkboard paint (for writing), magnetic primer (for magnets) and textured coatings like stucco. They may require extra prep work, but they can deliver professional-looking results if used correctly.

Regardless of the paint type you select, it’s crucial to use a high-quality primer. This will help ensure your finished product adheres to the surface, and it will also protect against mildew growth in moisture-prone areas.

A high-quality latex primer is a safe choice for most home projects, including cabinet painting. It provides excellent adhesion and helps prevent chipping and peeling, and it can be applied with a brush or roller (DIY-friendly) or a sprayer (advanced). When choosing a primer, be sure to avoid cheap options that are loaded with vinyl, which will compromise the overall quality of your project.

Primer

The first layer of cabinet paint should be a high-quality primer. This provides a surface for the new coat of paint to stick to, and it also covers any imperfections in the existing finish. Depending on the color you’re going with, you may need to apply two coats of primer before moving on to the finish coats. There are several types of primer available, including latex, shellac and oil-based options.

It’s important to properly sand the cabinets and doors before priming. The scuffing process helps to remove any sheen and gives the primer something to adhere to. It’s also a good opportunity to get rid of any dust or debris that has collected on the surfaces. Use a foam sanding block to lightly scuff the surfaces and then wipe them down with a damp cloth to remove any sanding residue.

The type of primer you choose depends on the surface material of your cabinets, but most any primer will work on bare wood and manufactured composites. The best option is an oil-based primer, which offers the strongest seal and stain blocking properties. However, water-based versions are now available that perform just as well and can be cleaned up more easily.

Once you’ve applied the primer, allow it to dry per the manufacturer’s instructions. Some can take as little as four hours, but others require up to 24 hours to completely cure. In some cases, you may need to sand the surface again after the primer is dry to smooth out any ridges and create an even finish.

While it’s tempting to skip the primer step, especially if you’re covering over light colors, it is important for achieving a strong and even finish. It’s particularly crucial for moisture-prone areas like kitchens, where mildew can be a problem.

A light-colored topcoat of paint can dramatically brighten your space, and it’s a cost-effective way to breathe new life into drab cabinetry. Start with a high-quality primer to promote adhesion, then apply the paint in thin coats, allowing each to dry before adding another. If necessary, sand lightly between coats to create a smooth, flawless finish.

Paint Color

Cabinet painting is a serious undertaking that requires the right paint, primer and prep work. Choosing the wrong type of paint can make it more difficult to achieve your desired look and result in costly repairs down the road. A high-quality product such as Advance Interior by Benjamin Moore is formulated specifically for cabinetry and offers unmatchable color, durability, ease of application and soap and water clean up.

When it comes to choosing a cabinet paint color, choose one that is timeless and classic rather than trendy. It’s not uncommon for homeowners to change the design aesthetic of their home in a few years, so it’s important to choose a shade that won’t become outdated quickly.

If you are unsure about what kind of paint to use on your cabinets, ask for recommendations from a professional. They can advise you on the best type of paint to use, taking into account your existing décor and the material that your cabinets are made of.

The color you choose for your cabinets will set the tone for the rest of your kitchen, so it’s important to consider how it will coordinate with other fixed elements such as countertops, backsplashes and hardwood floors. Choosing a color that works well with a variety of design aesthetics will appeal to more buyers and allow you to easily update your kitchen with new appliances or hardware later on.

Another factor to consider when choosing a cabinet paint color is the amount of natural light in your space. If you have lots of windows and a bright, open floor plan, opting for lighter shades can help your space feel larger. On the other hand, if you have smaller rooms or a darker décor, bolder hues can create a more intimate vibe.

Whether you’re going for a contemporary or traditional aesthetic, there are plenty of cabinet paint colors to choose from. Sage green is a recent trend that pairs beautifully with brass accents and natural wood finishes, while deep navy blue can make an impactful statement.

Replacing your cabinet hardware can also dramatically elevate the look of your kitchen. Pristine Painters recommends using KILZ ORIGINAL Aerosol to prime metal hardware before applying BEHR PREMIUM Metallic Spray Paint in your choice of finish. Choose a style that complements your cabinet door and frame, then add decorative knobs and pulls to tie everything together.

Finish

The finish of the cabinet paint will determine its durability and how easily it resists chips, scratches, and stains. There are many different finishes, so it is important to choose one that meets your specific needs and the look you want for your room.

Oil-based paint dries harder and can stand up to wear and tear better than water-based alternatives, which is why it is commonly used on cabinets. However, it does have a strong odor and requires mineral spirits for cleanup, which can make it difficult to work with in enclosed areas like kitchens. Oil-based paint also has a tendency to yellow over time, so it is best used in rooms with natural light.

Water-based paint, on the other hand, can withstand everyday use, and is more forgiving of imperfections than oil-based options. It does dry more quickly, though, so it can be a good choice for busy families. It also has a lower sheen, so it does not show as many fingerprints and smudges.

Satin and eggshell finishes have a soft sheen that is visually appealing but also helps hide any imperfections on the cabinet surfaces. These types of finishes are popular in modern homes and can be a great option for families with young children who may leave smudges or fingerprints behind.

High-gloss paint has a shiny, reflective quality that can look beautiful on cabinets, but it is more likely to show imperfections and requires more upkeep than satin or eggshell alternatives. If you do decide to go with a glossier paint, it is important to properly prep the surface before applying the coats. This includes lightly sanding and cleaning the area to prevent chipping or peeling.

When painting your cabinets, it is also important to keep in mind the color scheme of the rest of your space and choose a color that coordinates. There are many color choices, so it is easy to find a look that you love. Additionally, there are a variety of special finishes that can be used on cabinets to create a unique look in your home.